Wednesday, April 11, 2012

Happy Easter Cake

I hope everyone had a happy Easter. What a great holiday we had - the weather was beautiful and the company, as always, was fun and filled with laughs.  All the food was delicious. I think it might have been the best Easter food in a long, long time. 
I made this cake inspired by cakes I had seen online.  I decorated it in the style of a basket (sans the handle) using a basket-weave piping tool and added grass (colored coconut) and eggs (Robin's Egg candies) and Peeps to the top.
The cake was coconut lemon: white cake, lemon icing and lemon coconut filling. It was a combination of 3 different recipes, the icing being all mine. 


As far as the blog goes, I know I have been slacking. It has been a very busy time for me but I would like to get back into it. Because of work constraints, it is hard for me to keep up as much as I used to, but I am still cooking and baking, especially on the weekends!  I hope this spring/summer to have more regular entries and I thank you for continuing to follow.

Monday, June 6, 2011

Funfetti Cake Sandwich Cookies

Hello!  Long time, no posting.  It's all my fault.  Spring has been busy for me.  I know that is a lame excuse, but it's true.  But I am feeling back on my game now that the nicer weather is (finally) upon us.  And just because I have not been posting, does not mean I have not been cooking.  It's very much the opposite, actually! 

This past weekend we got together with friends who have two young kids.  I offered to bring dessert and went through my "to make" files to see what I could whip up.  I have so many things I have yet to try, but I did want to avoid anything with nuts because I know one of the kids is allergic to peanuts.  Therefore, my list became smaller and a little easier to go through.  I picked out this recipe I had seen on Serious Eats posted by Cakespy figuring it was the perfect thing to make for the kids. Kinda like cupcakes, but in cookie form.  Just as cute, but less mess. 

They came out great.  Everyone loved them (especially the kids).  I was actually surprised how much I liked them.  I will definitely be making them again!  The beauty of this recipe is that you can change it up by using different cake mixes and icing options. 

Funfetti Cake Sandwich Cookies
adapted from Cakespy

For the cookies:
1/4 cup butter, softened
1 package (8 ounces) cream cheese
1 egg
1/4 teaspoon vanilla
1 package funfetti or rainbow chip cake mix

For for the icing:
1 stick of butter, softened
3-4 cups confectioners sugar
evaporated milk (as needed for consistency)
1/2 teaspoon vanilla
pinch or two of salt
food coloring (optional)

1. Preheat oven to 350°F.
2. Cream the butter and cream cheese. Blend in egg and vanilla.
3. Add cake mix in two parts, mixing well (it will be a super thick batter—if it is too stiff, add a small quantity of heavy cream to the batter and mix well).
4. Form balls of cookie dough (about a tablespoon each) on an ungreased baking sheet. Leave about 2 inches between the cookies.
5. Bake for 8 to 12 minutes, or until lightly browned. Cool cookies for at least 15 minutes on the cookie sheet before transferring to a wire cooling rack; the cookies are very delicate when they first come out of the oven and they will break if you try to transfer them too soon.
6. Once completely cool, add a generous dollop of frosting to the bottom of half the cookies, and then sandwich the rest of the cookies on top to form something that vaguely resembles a whoopie pie, but tastes like something else entirely.

Friday, January 28, 2011

Skillet Lasagna

One of my favorite Christmas gifts I received this year was a cast iron skillet. I have been wanting one for awhile, so I had several dishes in mind that I wanted to try.  So far I have used it to make jalepeno cornbread, crab cakes, seared salmon and skillet potatoes/hash browns, all which were delicious.

My most recent experiment using my cast iron skillet was veggie lasagna.  When I first heard about this, I thought that the lasagna would be assembled in the skillet and then baked in the oven just like a regular lasagna, but that's not the case.  The cool thing is that the lasagna gets assembled in the skillet while it is on the burner and then stays there until it's cooked through.  The result was a fabulous tasting lasagna in about half the time.  
I did look at a couple recipes before doing this, mostly for technique, but as far as measurements and ingredients used, I did not follow a specific recipe. 

What you will need:
Sauce - I used a jar of low country tomato sauce from my sister in Charleston.  It's so good and adds so much flavor, but homemade or any jarred sauce will do.
Cheese - I used ricotta, parm and asiago, but mozzerella would obviously work too.
Noodles - You may use pre-boiled noodles, but I only had regular ones, so I soaked them in hot water before adding.
Veggies - I had asparagus, mushrooms and kale on hand, but any veggies would do, just make sure you par-cook them first if needed (I sauteed the mushrooms and asparagus but put in the chopped kale raw and it worked fine).

Method:
Place skilled over medium heat, add a layer of sauce, then noodles, then cheese mixture (15oz ricotta, 1 egg, parm, salt and pepper), then veggies.  Repeat layers until you get to the last set of noodles - top those with sauce and your melting cheese - in this case, asiago.  Cover and simmer lasagna on stove top for about 20 minutes.  For the last 5 minutes, take cover off and place under broiler so the top gets crispy and brown. 

It would be best to let this sit about 10 minutes before cutting into, but as usual, we could not wait a minute longer to start digging in.  I bet the leftovers will be even better!

Monday, November 22, 2010

Frittata Time

Happy almost-Thanksgiving!  It is hard to believe we have reached the busiest time of year. So, I thought it would be appropriate to post a great meal idea for any time of day that is perfect for one or for many:  The Frittata.

A frittata to me means "open-faced omelette".  I am not sure if this is what it is really supposed to be, but that's how I think of it.  I have had frittatas with leftover spaghetti, chick peas, potatoes, all sorts of veggies and cheeses (not necessarily all together).  It is a great dish to make in a pinch when trying to get rid of leftovers in the fridge.  It is also the perfect weeknight meal because it is so easy to make and requires little time.  The best part about the frittata is it can be made with so many different ingredient options for 1 person or a crowd; a perfect brunch option if you have visitors this holiday season. 

Here's how it's done: Basic Frittata
1. Chop up any veggies (and/or meat) you plan to add. 
2. Place appropriate sized pan (I use a 10 inch for 2 people) on burner and melt butter under medium heat.  Add veggies/meat to (oven safe) pan and saute a few minutes until softened.
3. In a bowl, whisk together eggs (2 per person) and some milk.  When veggies are softened, add egg mixture to pan.  Generously sprinkle with salt and pepper. 
4. Cook over low-medium heat until eggs are almost cooked through. 
5. Turn on broiler.  Top egg with shredded or sliced cheese.
6. Place frittata under broiler until cheese is melted and gets crusty on top.  Take out and cut into servings.  

The frittata pictured was asparagus, crab and brie.  A very tasty combo!

Monday, November 8, 2010

Candy Bar Brownies

Hello there.
I know, it has been a while.  This fall has been very busy so far and unfortunately, not all in a good way.  While I haven't stopped cooking or baking, I just haven't had the time to take and upload pictures or write posts (even though I don't write much!).  Hopefully this entry will be the first of many as we quickly approach the holiday season. 
My intention here is to solve a problem that we all face once a year: What do I do with all the leftover Halloween candy?  The obvious thing to do is just eat it, but even I get sick of the same ol' candy day after day. So I came up with something fantastic that literally transcends those boring candy bars into something spectacular: Candy Bar Brownies.
It's very simple: make a batch of brownie batter, pour half the batter into the pan, place cut up pieces of (chocolate) candy into the batter and cover with the remaining mixture.  Bake according to the recipe.  I like to mix up the candy and place in no particular order in the brownies; that way each bite is unexpected.  This year I used Snickers, Reeses PB Cups, Reeses Pieces and Heath Bars. 
Using a brownie mix would work fine, but while I am here I might as well share my favorite brownie recipe-and believe me, I have tried many! 

Fudge Brownies 
Recipe adapted from King Arthur Flour 
1 cup (2 sticks) butter
2 1/4 cups sugar
4 large eggs
1 1/4 cups cocoa powder
1 teaspoon salt
1 teaspoon baking powder
1 teaspoon espresso powder, optional
1 tablespoon vanilla extract
1 1/2 cups all-purpose flour 
2 cups semi-sweet chocolate chips (I do not add chips when making Candy Bar Brownies)

1. Preheat the oven to 350 degrees. Butter a 9×13 baking dish.
2. In small saucepan over low heat, melt butter completely. Stir in sugar and continue cooking for 1-2 minutes, stirring constantly. Do not allow sugar mixture to boil.
3. Pour butter mixture into a large bowl or stand mixer, beat in cocoa powder, eggs, salt, baking powder, espresso powder, and vanilla extract. Mix until well combined.
4. Stir in the flour and chocolate chips until well combined.
5. Pour into prepared pan and bake for about 30 minutes, until a tester comes out mostly clean. The edges should be set and the center should still look slightly moist, but not uncooked.  Cool on a wire rack.

Monday, September 13, 2010

Another Favorite This Summer

Another favorite for me this summer was strawberries.  I am a huge strawberry fan and this year they seemed to be superior (I am eating some right now).  

A few weeks ago, we had dinner plans in the evening with friends.  I had an abundance of strawberries so I thought instead of wine it would be fun to bring something unexpected for dessert.  I looked online to see what I could make with the ingredients I had and when I found this recipe, I knew in an instant that was what it was going to be.   

Cupcakes seem to be the in thing right now and while I do enjoy them, I still prefer a regular piece of cake.  But cupcakes are cute, fun and more informal than cake, so they are the perfect thing to bring to a casual affair.  I will post the recipe as it is written, but I did make changes to the icing.  I could not fathom using 2 full sticks of butter, so I started with 1/2 stick and added more as I went along until it was to my liking.  Overall, I  probably used 1 stick total for the icing.  They were so good and easy to make, I made them a week later for another event!

Sprinkles Strawberry Cupcakes
Makes 1 dozen

Cake:
2/3 cup whole fresh or frozen strawberries, thawed
1 1/2 cups all-purpose flour, sifted
1 teaspoon baking powder
1/4 teaspoon coarse salt
1/4 cup whole milk, room temperature
1 teaspoon pure vanilla extract
1/2 cup (1 stick) unsalted butter, room temperature
1 cup sugar
1 large egg, room temperature
2 large egg whites, room temperature

1.  Preheat oven to 350 degrees. Line a 12-cup muffin tin with cupcake liners; set aside.
2.  Place strawberries in a small food processor; process until pureed. You should have about  1/3 cup of puree, add a few more strawberries if necessary or save any extra puree for frosting; set aside.
3.  In a medium bowl, whisk together flour, baking powder, and salt; set aside. In a small bowl, mix together milk, vanilla, and strawberry puree; set aside.
4.  In the bowl of an electric mixer fitted with the paddle attachment, cream butter on medium-high speed, until light and fluffy. Gradually add sugar and continue to beat until well combined and fluffy. Reduce the mixer speed to medium and slowly add egg and egg whites until just blended.
5.  With the mixer on low, slowly add half the flour mixture; mix until just blended. Add the milk mixture; mix until just blended. Slowly add remaining flour mixture, scraping down sides of the bowl with a spatula, as necessary, until just blended.
6.  Divide batter evenly among prepared muffin cups. Transfer muffin tin to oven and bake until tops are just dry to the touch, 22 to 25 minutes. Transfer muffin tin to a wire rack and let cupcakes cool completely in tin before icing.

Icing:
1/2 cup whole frozen strawberries, thawed
1 cup (2 sticks) unsalted butter, firm and slightly cold
Pinch of coarse salt
3 1/2 cups confectioners' sugar, sifted
1/2 teaspoon pure vanilla extract

1.  Place strawberries in the bowl of a small food processor; process until pureed. 
2.  In the bowl of an electric mixer fitted with the paddle attachment, beat together butter and salt on medium speed until light and fluffy. Reduce mixer speed and slowly add confectioners' sugar; beat until well combined.
3.  Add vanilla and 3 tablespoons strawberry puree (save any remaining strawberry puree for another use); mix until just blended. Do not overmix or frosting will incorporate too much air. Frosting consistency should be dense and creamy, like ice cream.   

Tuesday, September 7, 2010

Corn and Chick Pea Salad

Hello, there!  It's been quite a while since I have posted.  August came and went so quickly, I just didn't have enough time to post much.  Hopefully, this will not be the case this fall.

My first entry of September will highlight the delicious corn I have been eating this summer.  It's bicolor corn from a farm in NY and it has been spectacular.  I have been buying a surplus every week and then making this salad with the leftovers.  Try it out while the corn is still good!

Corn and Chick Pea Salad
2-3 ears corn that have been boiled a few minutes
1 can chick peas, drained
1/2 red bell pepper, diced
2-3 scallions, diced
salt and pepper
few splashes each of olive oil and red wine vinegar

Carefully cut corn off ears.  Place all ingredients in a bowl.  Mix well and chill for an hour or so (to incorporate flavors).  When serving, garnish with avocado and/or feta cheese if desired.

Friday, August 6, 2010

Peanut Butter Cereal Treats

Want to feel like a kid again?  Make these!  They are so simple and yummy. 

Peanut Butter Rice Cereal Treats
7-8 oz marshmallow fluff
half a stick of salted butter
1/2 cup peanut butter
5 cups rice cereal
chocolate chips
a drop of vegetable oil

Melt butter, fluff and peanut butter in a pot over medium heat stirring constantly.  Once melted, add cereal and mix in well.
Put mixture into 9x13 pan and press down to flatten.  When cooled, cut into squares.
These are good just like this, but chocolate makes them even better!
Melt chocolate chips and oil in microwave.  Dip each square into the chocolate and put on cooling rack to harden.  To harden faster, place rack in fridge.

Wednesday, August 4, 2010

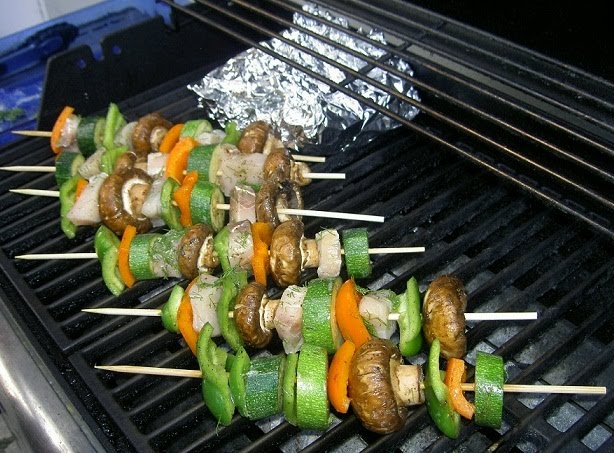
Swordfish Kabobs

This summer, we have tried to make the most of our backyard and use of the grill.  It's not so easy when you share a backyard with others and the grill is not right outside your back door.  But with simple planning, we have been able to pull it off several times so far and it has been quite enjoyable! Our last al fresco dining experience included swordfish kabobs with pesto potatoes and coleslaw. Swordfish on the grill might be one of the easiest and delicious ways to prepare fish of any kind.  Here is how it's done:

Swordfish Kabobs
Rinse and pat dry swordfish steak(s).  Cut into 1 inch cubes.  Place in bowl with a little olive oil, salt, pepper, a dash of white wine (if you have) and any fresh herbs you have on hand (optional).  Toss to coat fish.
Cut up any veggies you like - zucchini, mushrooms, peppers, onions, cherry tomatoes all work well - and in a separate bowl, toss with olive oil, salt and pepper.
Spear fish and veggies onto kabobs (if using wooden spears, please make sure you soak them in water for an hour or so).  
Once grill is hot, place on grill and let them cook for a few minutes.  Turn over and cook another 3 minutes or so.  The fish should cook pretty quickly since it is cut up.  Enjoy!

Monday, July 26, 2010

A Perfect Pantry Meal - Penne Alla Vodka

Since we were away this weekend, I did not have a fresh supply of groceries on hand for Sunday dinner.  This resulted in one of my favorite dishes on the planet - Penne Alla Vodka.  
The recipe I use is based on the version in the Williams-Sonoma Pasta Cookbook.  It is absolutely delicious, super easy to make and surprisingly light.  The best part may be that all the ingredients in this dish are probably things you already have on hand. 

Penne Alla Vodka
adapted from Williams-Sonoma
serves 2-3

8 oz penne
2 tablespoons olive oil
1-2 cloves garlic, thinly sliced
1/4 cup vodka
couple shakes of red pepper flakes
1 can diced tomatoes
salt and pepper
1/4 cup heavy cream
handful of fresh parsley, coarsely chopped
parmesan cheese to garnish

In a large pan over medium heat, warm the olive oil. Add the garlic and sauté until just starting to turn golden, 1 to 2 minutes. Remove the pan from the stovetop and add the vodka. Return the pan to medium heat and cook until reduced by half. Add the tomatoes, salt, black pepper and red pepper flakes and simmer, uncovered, for 10 minutes.

Meanwhile, bring a large pot of water to a boil over high heat. Generously salt the boiling water, add the pasta and cook until al dente (tender but firm to the bite), 10 to 12 minutes. Drain well and add the pasta to the pan.

Add the cream and cook, stirring, over medium heat until the pasta is well coated with the sauce, about 2 minutes. Taste and adjust the seasonings. Add the parsley and combine. Garnish with freshly grated parmesan cheese. Serve immediately.

Tuesday, July 20, 2010

Roasted Shrimp Salad

We are having quite a warm summer.  I am not complaining - I actually don't mind the heat.  But when the temperature is in the upper 90's for several days straight, I am usually not in the mood for a hot meal.
  
I saw Ina Garten make this the other day on her show.  I have made her roasted shrimp cocktail and have always gotten rave reviews, so I figured using the shrimp in a salad would be a great idea.  I only had a pound of shrimp, so I pretty much halved her original recipe.  Please don't leave out the orange zest and juice in the recipe; it really was great with the shrimp! 
Roasted Shrimp Salad
adapted from Ina Garten
1 pound large shrimp, peeled and deveined
olive oil
kosher salt & pepper
1/2 cup mayo  
zest of 1 orange
1 tablespoon freshly squeezed orange juice
splash of white wine vinegar
handful of minced dill
1 tablespoon capers, drained
1 tablespoon diced red onion

Preheat oven to 400F.
Place shrimp on sheet pan lined with foil and toss with olive oil, salt and pepper. 
Roast for 5-8 minutes just until shrimp are pink and firm.  Allow to cool 3 minutes. 
Because I was planning to serve this on rolls, at this point I cut each shrimp in half. 

Combine all remaining ingredients and when shrimp are cool, add shrimp to sauce and mix well.  Season with more salt and pepper if needed.  Chill if not serving immediately.

Monday, July 12, 2010

Black Bean Burgers

I love trying new recipes for veggie burgers.  Recently, I was in the mood for a Mexican-inspired burger so I found this recipe on Epicurious for black bean burgers and gave them a shot.   They are very good and hold up well on the grill, which to me is the best part!  Top with traditional fixins or like I did: with guacamole, jack cheese, jalapenos and fresh salsa.  Mmmmm...

Black Bean Burgers
adapted from Epicurious
2 (14-ounce) cans black beans, rinsed and drained, divided
3 tablespoons mayonnaise
1/3 cup plain dry bread crumbs
1 (4-ounce) can green chilis
2 teaspoons ground cumin
1 teaspoon dried oregano, crumbled
1/4 teaspoon cayenne
1/4 cup finely chopped cilantro

Pulse 1 can beans in a food processor with mayonnaise, bread crumbs, chilis, cumin, oregano, and cayenne until a coarse purée forms. Transfer to a bowl and stir in cilantro and remaining can beans. Add more bread crumbs if mixture is too wet.  Form into 4-5 patties.  Refrigerate before grilling; this will help to solidify the patties so that hey hold up on the grill.  When grilling, patties do not have to be in direct heat - just enough to heat through.
May freeze any unused patties for later use.

Wednesday, June 30, 2010

Banana Cream Pie!

Looking for something super delicious and easy to make for the holiday weekend?  Look no further than this recipe.  I made it for my dad on Father's Day because he is fond of bananas and cream (who isn't?).  And just when you thought it couldn't get any better it does - by adding a peanut butter crust.  
Here is the recipe.  And yes, it is as easy to make as it is to eat.
Banana Cream Pie with Peanut Butter Crust
Here is what you need:
1 package peanut butter sandwich cookies, such as Nutter Butters (I used a brand called Back to Nature which can be found at Whole Foods)
5 tablespoons melted butter
3 bananas
2 boxes vanilla instant pudding mix
2 cans cold evaporated milk, lowfat is fine
a lot of whipped cream (I make mine by combining heavy cream, Splenda and vanilla in my whipped cream maker)

Here is what you do:
Add the entire package of cookies to a food processor and pulse until fine crumbs are formed.  (You may also put in a big ziplock bag and form crumbs with a rolling pin).
Combine crumbs with melted butter and push into the bottom of 9in glass pie plate to form a crust.
Bake this at 350 for about 6-8 minutes until golden.  Be careful not to overbake.  
Let crust cool.  Make pudding by adding milk to pudding mix and stir (I could not believe how easy this part was; I had no idea).  
Slice up bananas and place on top of cooled crust.  Pour pudding on top of that. Cover and Refrigerate. 
When ready to serve, top with whipped cream.  
Resist the urge to smash into someone's face (although I don't think I would mind that!).
Happy Independence Day!!

Wednesday, June 23, 2010

Indian Egg Curry

 
I love Indian flavors, and am always looking to incorporate them into my cooking.  Sometimes I find recipes that look good but require too many ingredients that I don't have.  But when I stumbled across this recipe and realized find the only extra ingredient I had to buy was tumeric, I wanted to give it a try.  I was also intrigued by the sound of this dish.  Hard-boiled eggs in a curry?  I couldn't imagine what it would be like.  Both my husband and I liked this dish very much.  The eggs held their flavor and provided a creaminess to the dish. I served it over brown basmati rice and had plenty of leftovers for lunch!

Egg Curry
adapted from Honey, What's Cooking?
1 1/2 tbsp olive oil
1/2 tsp mustard seeds
1/2 tsp cumin powder
1/2 tsp tumeric powder
1 inch piece ginger, grated
2 cloves garlic, minced
3 jalepenos, chopped
1 large onion, chopped
1 can diced tomatoes
1 1/2 tsp coriander powder
1/2 tsp chili powder
6 hardboiled eggs, peeled
1 1/2 cups water
1/4 cup sour cream
3/4 tsp garam masala
2 handfuls cilantro, chopped
salt to taste

Directions:
1. Heat pot on stove under medium heat.  Add olive oil and mustard seeds.
2. Once seeds start to pop, add cumin and tumeric.  Saute for 10 secs.
3. Add ginger, garlic, and jalepenos. Saute 30 secs.
4. Add onions and some salt.  Stir and allow the onions to become golden, about 10 minutes, stirring every so often.
5. Once onions are golden, add tomatoes, chili powder, coriander, and a little more salt. Stir to combine. Cover and cook for 15-20 minutes until the onions and tomatoes become a paste consistency.  Stir every so often.  Here is where I added the sour cream (not in original recipe).
6. Add water and lower the heat. Cut the eggs in half and add to curry. Stir gently to combine. 
7. Cover and let cook 15 more minutes.
8. Turn off stove and add garam masala and cilantro.  Add salt to taste.
9. Serve on its own or over rice. Add hot sauce if you would like!

Tuesday, June 15, 2010

Zucchini Bread Cupcakes and Tomato Pie!


My youngest sister lives in historic and beautiful Charleston, SC.  Her boyfriend has always been in the food biz, which is very big down there as it is an huge tourist and foodie destination.  Most recently, he has been working for a farm out on Wadmalaw Island and therefore has access to fresh organic produce.   My sister has recently taken advantage of this and made the most of what he has brought home.  She sent me these pictures this morning and they looked so good I immediately had to post them.  So here it is: Zucchini Bread Cupcakes (ZBC's) and Tomato Pie!

ZBC's
Cupcake:
3 eggs
1 C vegetable oil
1 1/2 C sugar
2 C medium-fine grated zucchini
2 tsp vanilla
3 C flour
3 tsp cinnamon
1/8 tsp cloves
1/8 tsp ginger
1 tsp baking soda
1/2 tsp baking powder
1 tsp salt
1/2 C chopped pecans or walnuts (optional)
 
1. Preheat oven to 350 degrees.
2. Either grease cupcake tin or line with paper cups.
3. Beat the eggs with a whisk.  Mix in oil and sugar and then zucchini and vanilla.
4. Add flour, cinnamon, cloves, ginger, baking soda, baking powder, salt and mix.  (Then add nuts, if using.)
5. Pour batter into cupcake cups (distribute equally to make 24 cupcakes).
6. Bake for 20 minutes (25 max).
 
Cream Cheese Icing:
8 oz package cream cheese
1/2 stick (4 oz) butter
1 lb confectioners sugar
2 tsp vanilla
 
1. Soften the cream cheese and butter (but don't melt).  Beat until smooth.
2. Add sugar and vanilla.  Beat until smooth.
3. Slather onto room-temp cupcakes.
 
 
Tomato Pie 
Frozen pie shell (or make your own)
Spicy brown mustard
Grated cheese
Tomatoes (she used heirloom green and striped tomatoes)
Olive oil
Salt and Pepper
(Other herbs or grated vegetables can be added as well)
 
1. Defrost pie shell. 
2. Cover bottom of pie shell generously with spicy mustard.
3. Add layer of grated cheese.
4. Add layer of sliced tomatoes.
5. Sprinkle olive oil and salt and pepper on tomatoes.
6. Repeat steps 3-5 until pie is filled, leaving room for the top layer to be a tomato layer.  (Can substitute a layer of tomatoes with another veggie, ie: shredded zucchini.)
7. Bake at 350-375 degrees for 30 minutes.

Tuesday, June 8, 2010

Shrimp Enchiladas

I am a huge fan of Mexican food, so when I got an email from GE Appliances (I know, random) with a recipe for shrimp enchiladas, I had to check it out.  Let's just say I am glad I did - it was a hit!  I have made a Mexican shrimp lasagna before using salsa verde, but this version blew it out of the water.  The oven-heated  leftovers might have been even better.  I will definitely be making this again in the near future, perhaps for company as it feeds about 6. I tweaked the recipe a bit (as usual), so here is my version.

Shrimp Enchiladas
serves 6

Ingredients
2 tablespoons canola oil
1/2 cup sweet chopped red pepper
1/2 cup chopped onion
1/2 cup chopped green pepper
2 tablespoons chopped jalepeno slices (from jar)
1/2 teaspoon oregano
1/2 teaspoon salt
1 clove garlic, minced 
1/8 teaspoon pepper
1/8 teaspoon cayenne pepper 
3/4 cup heavy cream
1 tablespoon all-purpose flour
2 cups shredded cheddar or jack (or combo) cheese, divided
1/2 cup sour cream
2 tablespoons canola oil
1 pound medium shrimp, uncooked, peeled and deveined
1/2 cup onion, chopped 
1 can diced tomatoes
6 (9-inch) flour tortillas 
 
Procedure
Saute red pepper, onion and green peppers and jalepenos in oil until crisp-tender. Add oregano, salt, garlic, pepper, cayenne pepper, cream and flour and blend well. 
Continue cooking 3 minutes or until slightly thickened. Add 1 cup cheese and stir until melted. Add sour cream and stir, then set mixture aside in a bowl. 
Using the same pan, add a little more oil and heat.  Add shrimp, 1/2 cup onion, salt and pepper. Saute until shrimp are just about done. 
Chop shrimp into pieces and return to pan with onions. Add tomatoes and 1/2 cup of the cheese sauce to combine
Spoon 1/3 cup shrimp mixture onto each tortilla. Roll up tightly and arrange seam side down in a sprayed lasagna dish. Spoon remaining cheese sauce (and shrimp sauce if you have more left) over tortillas. 
Bake at 350 degrees F for 20 minutes.  Broil top (if desired) for a few minutes before taking out of oven.  Let dish sit a minute or two before cutting and dishing out.
Garnish with any or all of the following: fresh cilantro, avocado, lime juice, scallions, hot sauce.

Tuesday, June 1, 2010

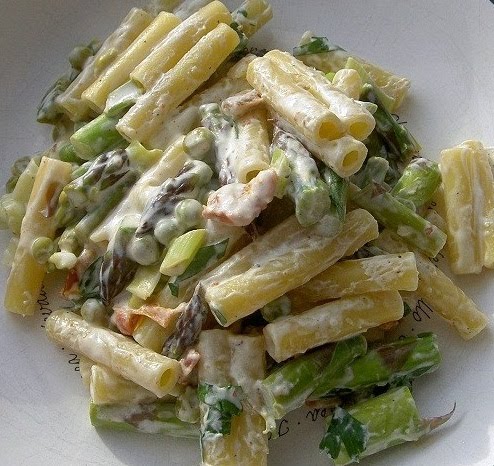
Pasta with Asparagus, Peas and Goat Cheese


Happy Summer!  Technically it is not yet summer, but it sure feels like it.  Here is a perfect pasta dish to make during the summer months.  The lemon in this dish really goes well with the goat cheese and asparagus.  It's light, refreshing and oh-so delicious.

Pasta with Asparagus, Peas and Goat Cheese
serves 4 
Ingredients
12 ounces pasta - I used ziti
2 tablespoons extra-virgin olive oil
handful of sun dried tomatoes, chopped
1 1/4 pounds asparagus, trimmed, cut on diagonal into 1-inch pieces
1 cup frozen peas (do not thaw)
1 bunch green onions, sliced
2 garlic cloves, minced
4 ounces goat cheese (chevre)
1/3 cup heavy whipping cream 
3 tablespoons fresh lemon juice
1 tablespoon finely grated lemon peel
1/4 cup chopped fresh Italian parsley
1/4 cup thinly sliced fresh basil

Tuesday, May 25, 2010

Colossal Crumb Cake

I don't think there is a person on the planet who would say they do not like crumb cake.  I prefer crumb cake over any doughnut, danish, or cinnamon roll for breakfast - it is my absolute favorite.  I have tried Martha Stewart's recipe a couple times but had to stop making it because I could not stop eating it!  But when I saw this recipe on Serious Eats, I could not resist.  I HAD to try it.  Anticipating that I would be able to give some away to family, I decided to make it this weekend.  Luckily, it freezes well, so hopefully I can show some restraint and put the rest of what I have in the freezer for later consumption.

First let's start with the most important component: the crumbs!
I am not sure if this picture gives the crumbs justice.  This is the biggest bowl I own.  The utensil in the picture is a big serving fork (not regular size), so hopefully that will help you to understand just how much of the cake is made up of this delicious crumb topping.

Now for the cut-out corner shot: to say that getting this piece out was easy is a lie.  To say that I did not enjoy eating all the bits of crumbs that fell off the top is another lie.

And finally, the piece de resistance: the cross-section.

Now, this is a particularly big piece... I would not recommend eating all of this in one sitting; while your tastebuds would be very happy, your stomach would not be later on.  Plus, you would probably not be able to move for a while.

So, as long as you stick to smaller-sized pieces and/or have a good crowd of people share this with, I recommend you make this.  It is unbelievably good.

Colossal Crumb Cake
adapted from Arthur Schwartz
serves a small army

For the crumb topping:
3 cups (6 sticks) unsalted butter
7 1/2 cups all-purpose flour
4 1/2 cups packed dark brown sugar (I used half light/half dark)
1 1/2 teaspoon salt
4 teaspoons vanilla extract
5 tablespoons cinnamon

For the cake:
2 1/4 cups sifted unbleached all-purpose flour
2 teaspoons baking powder
1/4 teaspoon baking soda
1/2 teaspoon salt
10 tablespoons unsalted butter, room temp
1 cup superfine or strained sugar
2 large eggs
1 teaspoon vanilla extract
1 cup sour cream

1. Make the topping: Melt the butter in a medium saucepan over a low flame.  Remove from heat and cool for about 5 minutes, but do not allow butter to become cold. Transfer butter to a very large mixing bowl.
2. Add the flour, sugar, salt, vanilla extract and cinnamon.  Stir together until mixture forms small crumbs.  Set aside.
3. Preheat oven to 350 with the rack in the lower third of the oven.
4. Butter a 9x13 inch pan.  Dust lightly with flour.
5. Make the cake: Combine the flour, baking powder, baking soda and salt in large bowl and whisk together.
6. Add butter to a large bowl of a stand up mixer.  Cream butter until soft. 
7. Add sugar 1 tablespoon at a time until well combined. Scrape sides of bowl occasionally.
8. Add eggs, one at a time, scraping sides as necessary. Add vanilla.
9. Reduce mixer speed to low.  Add the dry ingredients alternately with the sour cream, dividing the flour mixture into 3 parts and the sour cream into 2 parts, starting and ending with the flour.  Mix just until incorporated after each addition.  Scrape sides down and mix for another 10 seconds. 
10. Scrape batter into prepared pan, smoothing the surface with a rubber spatula.
11. Pour crumb mixture over the cake in the pan.  Make sure to gently press down crumbs on top of batter. Try to make sure the whole surface is covered well (this should not be a problem).  
12. Bake in preheated oven for 30 minutes or until cake is golden brown and begins to come away from the sides of the pan.  
*Just a note - my cake needed a little more than 30 minutes for the middle portion of the cake to be cooked through, but ovens may vary so be sure to keep an eye on it!
 Nothing but crumbs!

Monday, May 24, 2010

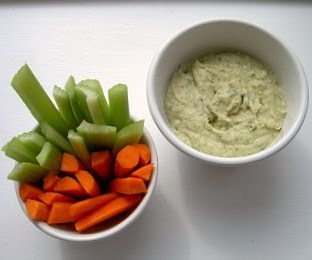
White Bean Dip

A quick and easy recipe for a variation of hummus.  Serve with veggies and pita chips.

White Bean Dip
adapted from Giada De Laurentiis
1 can white (cannellini) beans
2 cloves garlic
2 tablespoons fresh lemon juice
1/2 cup fresh parsley
2 tablespoons olive oil
salt & pepper to taste

Blend all ingredients in a food processor.  Chill to allow flavors to combine.  I think next time I will add a couple sprinkles of red pepper flakes to spice it up a bit!

Friday, May 21, 2010

New Oven!

So...I am very happy to report that I got a new oven and microwave!  [It's a little pathetic that this is what I get excited about, but it's true].  The oven is a dual-fuel, so it's a gas range with an electric convection oven.  It was quite a project getting it installed, especially since our old oven was all gas.  We didn't realize it would be a problem until the delivery people brought it up (3 flights of stairs) and saw that we didn't have the correct outlet to connect the oven.  Luckily, our electrician was able to come in and remedy the problem and now it's up and running! 

Of course I had to test it out immediately, but since it was already pretty late, I did not want to make anything too elaborate.  I had these beautiful blackberries in the fridge, so I decided to make a blackberry cobbler/crisp.  It was probably the best I have ever made.... and I am convinced it was all the oven's doing!
Blackberry Crisp
serves 6-8
1 1/2 cup blackberries 
1/4-1/2 cup walnuts
1 cup Splenda
sprinkle of brown sugar
1 stick melted butter
3/4 cup whole wheat flour
1/2 tsp vanilla
pinch of kosher salt

Preheat oven to 350.  Spread out blackberries evenly on bottom of 9in glass pie pan.  Roughly chop walnuts (I just broke by hand) and place in between berries.  Mix together the remaining ingredients and place on top of berries.  Bake for about 40 minutes.  Try to hold off from eating it all in one sitting! 

This dish is great served warm by itself or with whipped cream or vanilla ice cream on top.  I have been enjoying it cold with a dollop of plain yogurt on the side for breakfast!

Oh, and how could I forget to include a picture of my new baby!  Sorry it's a little blurry, but you get the picture...